1.- Crear un pa�o de 1000
X 900px
Paleta de colores foreground #b89376
background #6d515f formar un
gradiente linear 0 0
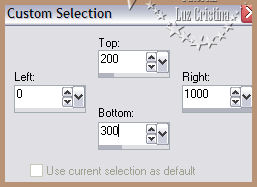
2.- Herramienta selection
tool / custom selection
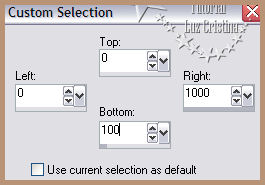
Pintan la selection con el
gradiente
3.- Filtro Neology / digital
weaver con 50 105
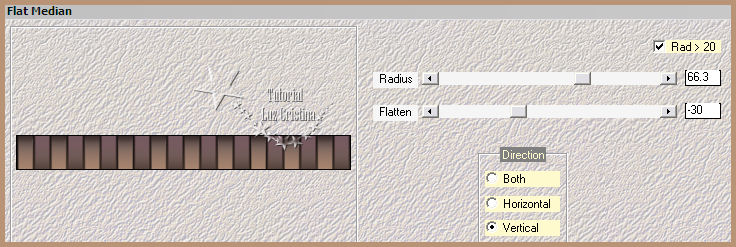
4.- Filtro Mehdi2 / flat
median
5.-Selection none. Copy su
figura
6.- Herramienta selection
tool / custom selection
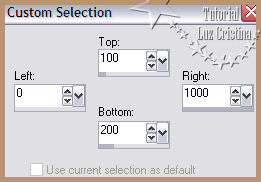
7.- Filtro VM Toolbox (lo
import� por el Unlimited2)

8.- Texture effects /
sculpture
Selection none
9.- Drop shadow con 1 1 80 1
10.- Herramienta selection
tool / custom selection
11.- Paste into selection su
figura copiada / selection
none
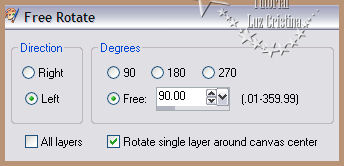
12.- Image / free rotate
13.-Reflection effects /
rotating mirror con 0 180
reflect
14.- Filtro Simple / left
right wrap
15.- Geometric effects /
perspective vertical con -95
transparente
16.- Adjust / sharpness /
sharpen
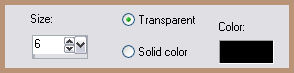
17.- 3D effects / chisel con
6 transparente
18.- Drop shadow con -12 20
80 50
19.- New raster layer /
arrange send to bottom /
Pintan con el gradiente
20.- Repitan los pasos 3 y 4
21.- Distorsion effects /
pinch con 100
22.- User defined filter /
emboss 3
23.- Layers / duplicate /
image / flip
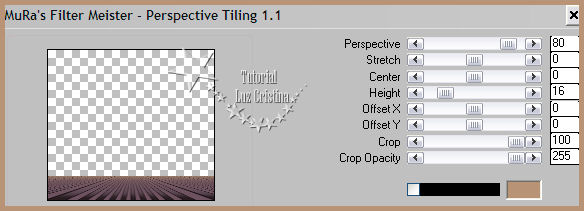
24.- Filtro Muras M. /
perspective tiling
25.- Image effects / offset
con 0 60 repeat / rotating
mirror mismos valores
26.- Vamos a la raster 1
donde tenemos la figura /
Image effects / offset con 0
250 transparente
layers / arrange move down
27.- Cierre esta layer para
ver mejor, copy su misted y
paste as new layer, acomode
a la izquierda
como en mi ejemplo / layers
/ duplicate / image / mirror
/ layers / merge down
28.- Layers / duplicate.
(para mayor nitidez)
29.- Layers/ Merge down
30.- Copy el tube de las
palmeras y paste as new
layer / move up
31.- Aplicamos la misma drop
shadow anterior
32.- Layers duplicate
33.- Blur / radial blur

34.- Texture effects / weave
35.- Layers / arrange move
down
36.- Seamless tiling
37.- Filtro FMTT /
saturation emboss
38.- Copy el tube de la
mujer y paste as new layer /
aplique la misma drop shadow
39.- Image add border de 5px
symetric color negro
add border de 45px color
#6d515f
40.- Filtro AAA frames /
fotoframe por default con
width en 20
add border de 5px color
negro
Resize en 85%